
Thursday photo workshop, part 7: lightbox/ artificial light DIY

This is a very fast and rough project, since I'm very busy. Feel free to create a design version of it! But it works, and thats's the main part, isn't it?
Still, natural light is what I prefer, but sometimes you need more light than you have or can create by bouncing it back or overexposure. All you need is a neon work space lamp and an aluminium car windscreen sunshade. Those ones are cheap and transportable reflectors btw!
_____
Das ist ein sehr schnelles und grobes Projekt, da ich superviel um die Ohren habe. Ihr dürft Euch gerne eine Designversion davon ausdenken! Aber es funktioniert, und das ist ja wohl die Hauptsache.
Das ist ein sehr schnelles und grobes Projekt, da ich superviel um die Ohren habe. Ihr dürft Euch gerne eine Designversion davon ausdenken! Aber es funktioniert, und das ist ja wohl die Hauptsache.
Natürliches Licht ist immer das, was ich vorziehen würde, aber manchmal benötigt man einfach mehr Licht als man nur mit Reflektoren oder Überbelichtung hinbekommt. Alles, was Ihr braucht, ist eine Neon-Arbeitsplatzlampe und ein Alu-Sonnenschutz für die Auto-Windschutzscheibe. Die sind übrigens billige und leicht zu transportierende Reflektoren!

Cut out a rectangle and make two slits. Schneidet ein Rechteck aus und macht zwei Schlitze.
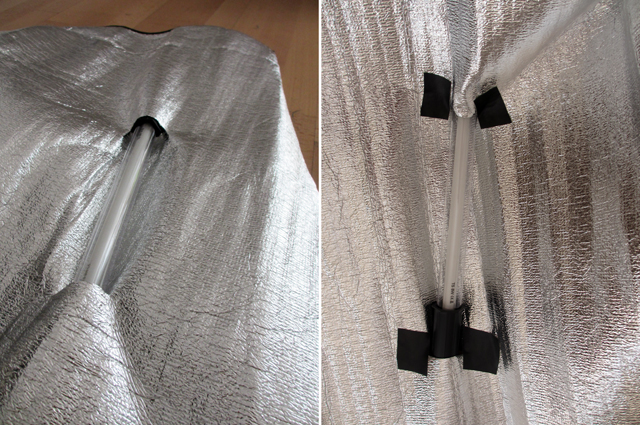
Put the lamp through the two slits. Fix the ends of the slits with thick duct tape to prevent the fabric from tearing out.
____
Steckt die Lampe durch die zwei Schlitze. Fixiert die Enden der Schlitze mit festem Textilklebeband, damit die Schlitze nicht ausreißen.
Steckt die Lampe durch die zwei Schlitze. Fixiert die Enden der Schlitze mit festem Textilklebeband, damit die Schlitze nicht ausreißen.

Now stick the corners together. Klebt jetzt die Ecken zusammen.

This is how the lightbox should look like. A bit like a stranded cow from this perspective, but it works ...
_____
Und so sollte die lightbox aussehen. Ein bißchen wie eine gestrandete Kuh, aber es funktioniert ...
Und so sollte die lightbox aussehen. Ein bißchen wie eine gestrandete Kuh, aber es funktioniert ...

You can easily fold the lightbox for storage of transport .... The whole project did cost about 10 Euros.
_____
Die ligtbox lässt sich fürs Verstauen oder den Transport ganz einfach zusammenlegen. Das Ganze hat um die 10 Euro gekostet.
Die ligtbox lässt sich fürs Verstauen oder den Transport ganz einfach zusammenlegen. Das Ganze hat um die 10 Euro gekostet.

And here you can see the difference - the picture above is without light, the photo below with the DIY lightbox. SOOC - no photoshop.
_____
Und hier seht Ihr den Unterschied - das Foto oben ist ohne Licht, das Foto unten mit der DIY lightbox. Kein Photoshop, direkt und unbearbeitet aus der Kamera.
Und hier seht Ihr den Unterschied - das Foto oben ist ohne Licht, das Foto unten mit der DIY lightbox. Kein Photoshop, direkt und unbearbeitet aus der Kamera.

And even better as a closeup. Have fun - and if you're going to create a design version (or wonderful pictures), leave a link in the comments!
_____
Und als Makro sogar noch besser. Viel Spaß - und wenn Ihr eine Designversion macht (oder tolle Fotos), hinterlasst einen Link in den Kommentaren!
Und als Makro sogar noch besser. Viel Spaß - und wenn Ihr eine Designversion macht (oder tolle Fotos), hinterlasst einen Link in den Kommentaren!


5 Kommentare:
Ich finde deine Tipps echt super. Vielleicht muss ich mal anfangen sie auch einzusetzen :)!
Das letzte Foto ist wirklich grosse Klasse!
Oh wow. Too funny...it does look like a stranded cow! In a future post could you show how the lightbox is set up in your shoot? Not sure I'm understanding that part. THANK YOU for sharing, especially when you are so busy!
"Geil" - das ist mir rausgerutscht, als ich die Makroaufnahme sah. Schöne Perspektive und toll mit dem Silber und Türkis. Richtig schön!
Und Katrin, danke für den genialen Tipp, einen Alu-Windschutzscheibensonnenschutz als Reflektor zu nutzen. Wäre ich nicht drauf gekommen und dabei eignet sich das wirklich perfekt. DANKE!
Liebe Sandra, hab ich auch erst entdeckt, als ich Material für die lightbox gesucht hatte.
Dear Robin, I just put the light/ lightbox next to the car. Next time, you'll get a picture of the arrangement!
Kommentar veröffentlichen
I'd love to hear from you - Eure Kommentare sind das Schönste am Bloggen ...